
Credit : Untitled (ZeitounZeClown)
Whatever the light source, whatever your level, once your camera configured for long exposures, Light Graff is the basic technique of Light Painting.
Définition
Light Graff or Light Graffiti, involves moving a light source to create traces of light, drawings, graffiti... You are free to write texts, to make simple or complex drawings, express your art side!
Lettering
The term "lettering" comes directly from the graffiti community. As the name implies, do lettering is writing a text. At this little game, no need to tell you that it takes a large dose of skill to get good results.
Although basic technically, make quality lettering require sometimes lot of training, even for a painter or a confirmed grapher!!
Constraints to master
Here's a list of the difficulties that you will have the pleasure to deal with when you launch.
- Working in a vacuum
- At no time during the picture you will see what you do. The painter needs to work on the fly and without any return. To be successful, a good representation in space is mandatory.
- Fluidity of gesture
- Whatever the size of your text, you have to be able to perform loose and fluid movements. Because the slightest deviation or hesitation has high chances of being clearly visible on your picture!
- Write upside
- Yes I Do! As the ambulance, when you write in front of your camera, you write backwards. If your photo contains objects or a scene that can not be reversed in post-production, you have no choice! At first it's a real mental gymnastics to get there ... but with a little practice, it's not so hard you'll see.
- Avoid unwanted defects
- Depending on the tools you use, it will not be possible to easily control the lighting of the light source. Hence the risk of leaving unwanted traces in your photos. Hence also the advantage of using the most suitable tools possible.
- Work in the dark
- Indeed, it seems elementary, but sometimes impractical, even dangerous. A constraint to never forget when you do Light Painting.
The solutions to get by
For each problem, its solutions! So let's see what we can advise you ...
- Working in a vacuum
- Take maximum marks before starting your picture. Please install ground marks to calibrate the maximum each form so that it is positioned correctly in your frame. If you have to move, count the number of steps to do. Ideally, trying to take a step by letter, you will get more regular texts.
- Fluidity of gesture
- Train you again and again! Then it is a talent you have or not. Personally, I don't, so I often call graffiti artist, real pros of the drawing, this further adds to the pleasure of creating together.
- Write upside
- Frankly, when performing simple lettering, it is only a matter of practice and concentration. The trick is to visualize the letter upside down, and the alphabet comes gradually. For more complex lettering, it is strictly impossible ... So in most cases, write normally and then simply make a horizontal symmetry in your favorite image management software. Be careful not to let so in the frame any details that might betray you: traffic signs, signs, large text on the t-shirt!
- Avoid unwanted defects
- Well consider maneuverability in your choice of lamps, not just their technical performance. And buy all your gear on www.lightpainting-addict.com, of course ...
- Work in the dark
- For starters, do not forget to keep light near and ask your partners to help you. Then think about giving each participant a small light, so that he is autonomous in the dark (a simple scripting will do). Finally, prepare your photo, repeat it before you realize it, especially if there are potential dangers. Better take 1 minute to prepare your photo finish with a sprained!
Tutorial
Goal: Make your first lettering in Light Painting.
In this tutorial, we will see together how to make your first lettering Light Painting. You will see, nothing difficult, let's go step by step.
- Settings
Before you get down to business, take time to setup your device depending on the lamp power you will use. If you are not in the dark, do not forget to take into account the exposure time required to draw!
For example: in the dark with a basic lamp: Focal F11 and ISO 100.
- Tests
- Do some tests to make sure framing is ok, that focus is done and your settings are good. Once finished configuration, you only have to execute.
- Watch!
- Before you start, you train, visualize, conceptualize. Select the text to write, how you want to organize your photo and imagine the scenario that will allow you to achieve it.
- Which Police?
- So if you can stomach it, this is the time to express your love of calligraphy, or your talent grapher. But first, sticks largely letters will do!
- Shoot!
- Bulb is set, the text is mastered, it'll just do it!
- Trick
- Although a lettering is mostly 2D, do not forget to play 3D to give volume to your texts and drawings! Do not stand facing the camera, orientate your texts, make it go forward or back to give them more or less weight.
See below some nice results with different types of lamps.

Flor by Luz de :::DaNka::: on Flickr
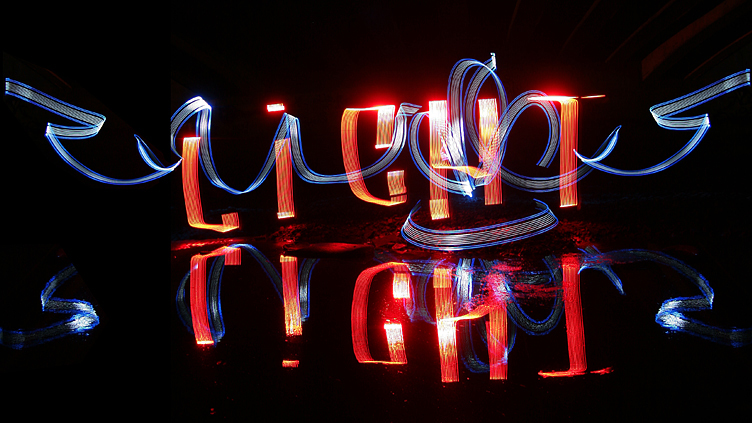
Light by Mishel Churkin on Flickr

Light Graffiti by Phaedrus007 on Flickr

Light Graffiti Urbe by karialex on Flickr
Comments
Leave your comment